PC Build Performance
Update - Following a disappointing launch by NVIDIA, I was fortunate enough to be one of the few who procured an NVIDIA GeForce RTX 5090 from the NVIDIA GPU Technology Conference (GTC) for under MSRP (£1688.15). Expect to see additional posts once I have completed my initial testing.
Last week, I purchased the components for my custom-built PC upgrade.
This was my first major upgrade since 2021, in preparation for the launch of the NVIDIA GeForce RTX 5090.
Unfortunately, the NVIDIA GeForce RTX 50 series has had a very disappointing launch, with restrained availability worldwide, resulting in aggressive scalping that has pushed the prices up significantly. For example, the RRP of the NVIDIA GeForce RTX 5090 Founders Edition is £1939 but is currently being sold on eBay for £3,500 and beyond.
In addition, those who did receive an NVIDIA GeForce RTX 5090 are facing some early adopter challenges, such as driver errors and (more concerningly) issues with the 12VHPWR power connector overheating and melting.
This entire situation is frustrating and could have been easily avoided. I recognise that the consumer graphics card market represents only a tiny part of the NVIDIA business. However, considering their heritage, I wish they would treat their loyal customers with more respect.
I refuse to pay over the RRP for a graphics card that is arguably already overpriced for the performance. Therefore, I will continue to use my NVIDIA GeForce RTX 3090 Founders Edition until the market stabilises.
The specification of my current (soon-to-be old) PC can be found below.
- MSI MAG X570 Tomahawk WiFi
- AMD Ryzen 9 3950X 3.5GHz Base / 4.7GHz Boost (16C/32T)
- Noctua NH-D15 CPU Cooler
- 64GB Corsair Vengeance LPX DDR4 PC4-28800C18 3600MHz RAM
- 1TB Samsung 980 Pro M.2 PCI-e 4.0 NVM-e SSD
- 1TB Samsung PM981 M.2 PCI-e 3.0 NVM-e SSD
- NVIDIA GeForce RTX 3090 FE 24GB GDDR6x
- EVGA SuperNova P2 1000W ‘80 Plus Platinum’ PSU
- Fractal Torrent Compact
- Samsung G95NC Odyssey Neo G9 57-inch Monitor
I purchased the following new components, retaining my existing graphics card, case, monitor and peripherals.
- MSI MAG X870 Tomahawk WiFi
- AMD Ryzen 9 9950X 4.3GHz Base / 5.7GHz Boost (16C/32T)
- Noctua NH-D15 G2 LBC CPU Cooler
- 64GB Corsair Vengeance EXPO DDR5 PC5-48000C30 6000MHz RAM
- 2TB Crucial T705 M.2 PCI-e Gen5 NVM-e SSD
- Corsair HX1200i 1200W ‘80 Plus Platinum’ ATX PSU
The full details of the upgrade, including the rationale for each component, can be found in my previous article “GeForce RTX 5090 Build”.
I have now built the PC and can share some initial performance results. As previously stated, I am still using my old NVIDIA GeForce RTX 3090. Therefore, performance benefits targetting graphics-intensive workloads will be limited.
Build
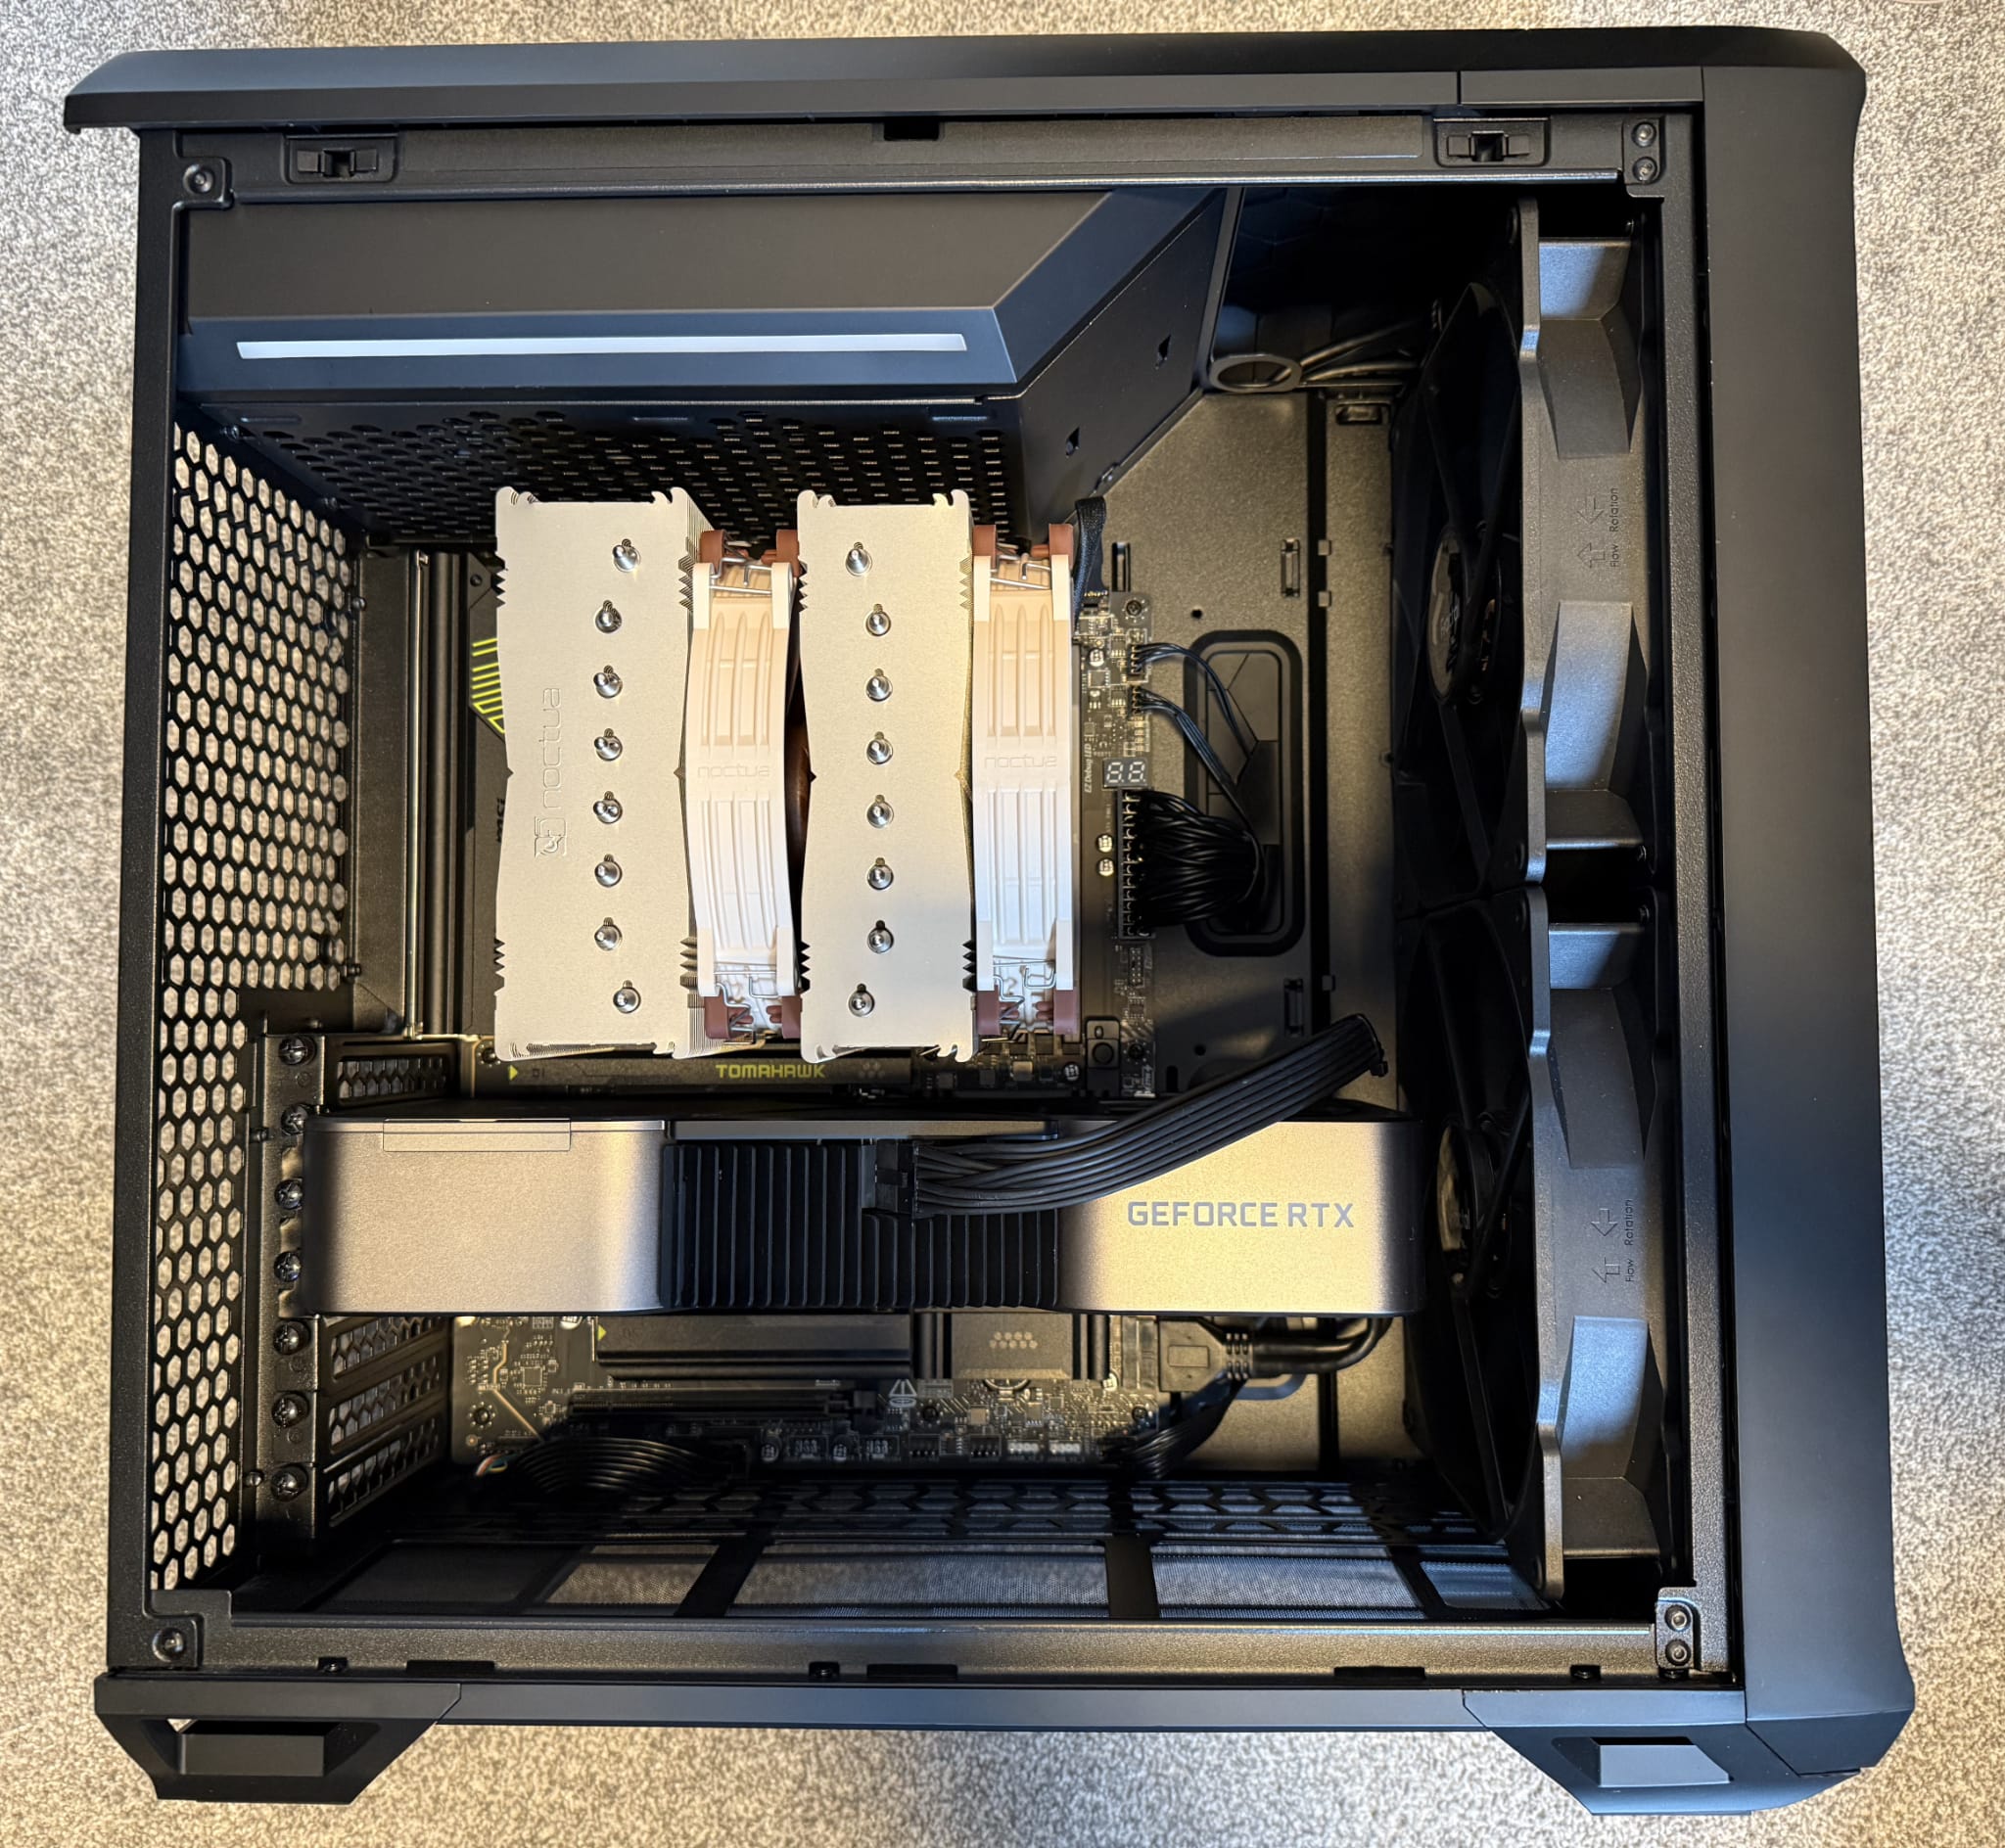
The build process itself was very straightforward, with no notable issues. Over the years, I have built countless computers, but this was arguably the simplest ever.
The only point of “tension” was the application of the thermal compound on the processor. I use Noctua NT-H2, which has proven to be highly performant and does not require any special preparation (no break-in or burn-in time).
I follow the Noctua recommended approach for thermal compound application, specifically one larger dot in the centre, with four smaller dots at each edge. Recognising the unorthodox shape of the AMD Ryzen 9950X heat spreader, I also used the Noctua NA-TPG1 thermal paste guard.
Finally, I tested the system prior to completing my cable tidy process (a mistake I have made in the past).
With the hardware installed, I reset the BIOS to factory default, downloaded the latest Windows 11 ISO from Microsoft and triggered the setup process.
Frustratingly, the Windows 11 ISO did not recognise the network devices (Ethernet or WiFi) during the setup. Due to the ridiculous and infuriating requirement for an Internet connection, I had to perform the bypass procedure.
The bypass procedure is achieved by clicking “Shift + F10” during the Windows 11 setup process (which launches the command prompt) and typing ‘oobe\BypassNRO’. At this point, the setup process will restart, providing an option to skip network connectivity.
Over the past few years, I have become increasingly disappointed by Windows as an operating system, which has quickly become a vehicle for Microsoft to publish advertisements, attempting to sell their services such as Microsoft 365, Copilot and GamePass.
I would love to switch to Linux full-time. However, unfortunately, there are still too many blockers that would impact my common workloads (e.g., Microsoft Office Suite, Games with Anti-Cheat, etc.)
With Windows 11 finally installed and updated, I confirmed system stability, before updating and configuring the BIOS for optimal settings. I enabled the AMD Extended Profiles for Overclocking (AMD EXPO) and AMD Precision Boost.
I plan to overclock the system using a combination of AMD Precision Boost and AMD Curve Optimiser. However, I prefer to test “default” performance and reliability before configuring more advanced settings.
Performance
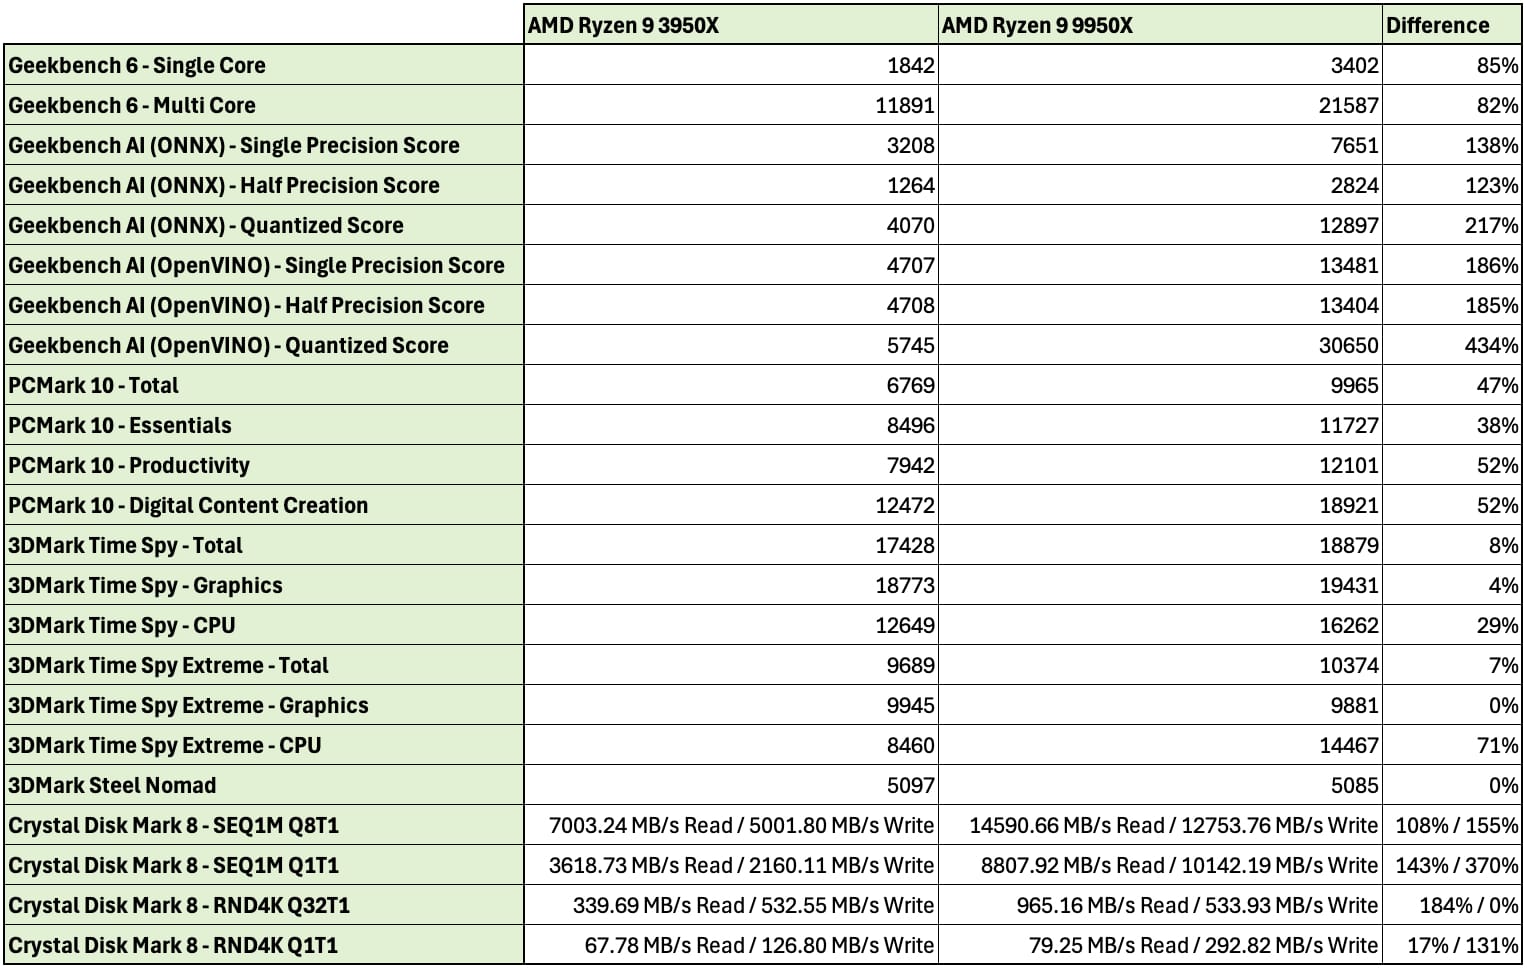
The table below provides the results from a series of tests, highlighting the performance improvements over my old AMD Ryzen 9 3950X PC.
As expected, the jump from the AMD Ryzen 9 3950X to the AMD Ryzen 9 9950X is significant, covering single-threaded and multi-threaded workloads.
The memory and storage results were also impressive, supported by the jump to DDR5 and the ridiculous performance of the Crucial T705 M.2 PCI-e Gen5 NVM-e SSD, delivering 14,500MB/s for sequential reads and 12,700MB/s for sequential writes.
It should be noted, that these performance results (specifically the storage results) do not necessarily represent “real-world” increases.
On average, at default settings, the upgrade has delivered a 93% performance increase for CPU/Memory focused tasks and 139% for storage focused tasks, which was above my expectations.
In a future article, I will share more details regarding my configuration and start to explore AMD Precision Boost and AMD Curve Optimiser to unlock additional performance improvements.

